Cricut Design Space, Cutting and Crafting
Photo puzzle tutorial with Cricut

Tutorial on how to make a photo puzzle with a Cricut machine!
Creating a puzzle with a Cricut machine is the coolest thing ever! This is a fun game that can be a perfect gift not only for kids! This is a super cute project that you can customize any way you want. Just follow the steps in this tutorial and create a photo puzzle of dreams with a Cricut machine.
Supplies needed
First, open cricut design space. It offers puzzle templates, and if you have a cricut access subscription the price is lower.
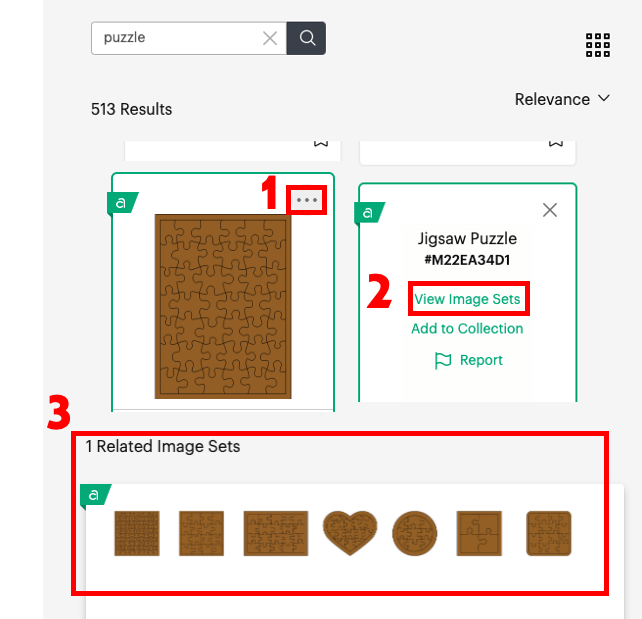
Click on “images” and type in the search bar “puzzle”. Find the image you want. Select it and click on the three upper dots. After that click on “view image sets” to see the different puzzle options. Upload the design you have chosen. Then it’s time to upload the image to create the photo puzzle.
Click on “upload” and then on “browse”. Choose the “complex” option because it is the better choice to keep all the details of the image. Continue and click on “print then cut image” to upload it to cricut design space. Then add the image to the canvas. After that, add the image to the canvas to create the photo puzzle.
Making the photo puzzle design
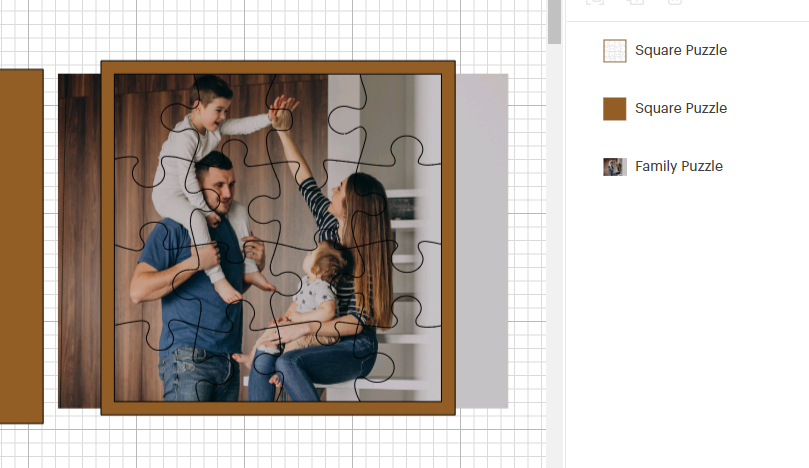
The first thing to do is to size the puzzle design without ungrouping the layers so as not to deform it. Then ungroup it to see the different layers. The puzzle design has two different layers. A solid shape that will be the base of the puzzle. On it we will put the pieces.
The second layer is the puzzle itself, it has the pieces and a thick border. That border is to glue it to the base and has a kind of frame around it. To see the layers, ungroup the design. Now it’s time to fit the image into the puzzle design to make it look nice. Hide the solid shape to better visualize the image. That way, only the line cuts of the puzzle will remain. Place it over the part of the image you want.
Print then cut tips
The largest size the design can be is 6.75 due to print and cut restrictions, so keep that in mind. To prevent future problems with the Cricut not allowing to cut the design, size it to the maximum size. This is just a recommendation in case you want it to be large. Then, resize the image inside it.
Here’s a super tip! If the image has too many parts outside the puzzle template it’s best to remove that excess. Use the cricut slice feature to do so! If you don’t know how to use the most important functions of Cricut Desing Space, take a look HERE.
To slice the image, add a regular shape such as a rectangle or a circle. The idea here is not to slice the image to the exact size of the puzzle template because it will be difficult to line everything up in the future. To clarify, leave enough space to work with but not too much to waste material. After that, select the image and the shape and click on slice, pull the pieces away and delete the excess.

How to make the photo puzzle
First of all print the image, click on “make it” and then on “send to printer”. As a recommendation make some modification in the print settings, for this click on “use system dialog” and click on “print”. In the print settings click on best in quality below and then click on print.
After that, it’s time to cut the image. This cut is just to make the edges of the image nice and straight. We will not cut the puzzle design on the printable vinyl without adhering it to the chipboard. Find the printable vinyl setting and click “more” in the cut settings to make the cut as clean as possible. Place the printed image on the lighgrip mat and make sure it is well adhered using a brayer. Send the machine to cut.
Printable vinyl is the best option for creating a photo puzzle. It is easier to print the image and glue it to the chipboard. This way the cricut machine will cut the puzzle pieces with all of them perfectly aligned and the process will be faster.
Now let’s cut the base. Take some chipboard and find its cutting settings. As a recommendation use the 2.5mm chipboard setting for 1.5mm chipboard, it works best. Use the strong grip mat to cut the chipboard. Use a brayer to really press into the mat and add some painter’s tape on all 4 sides to make sure it doesn’t move and ruin the cut.
Also, use the knife blade to cut the chipboard and put the white wheels all the way through to the right. At the end make sure if it is cut all the way through before removing the mat, if not, just send it to cut again.
Align vinyl on chipboard and design
Now it’s time to cut out the puzzle template and create the photo puzzle itself. Place the design one inch down and one inch to the left on the design space cricut grip mat, so you then know where to place the picture on the strong grip mat.
Use the ruler and mark one inch down and one inch to the left on the chipboard to make sure the photo lines up with the template. Adhere the photo to the chipboard, taking as reference the 1-inch marked lines. First remove a portion of the backing, and adhere it to the chipboard. Then start removing the rest slowly.
Use a brayer to press the image well onto the chipboard and start cutting the puzzle. Cutting the puzzle template takes a long time, so, as a recommendation, close the cutting machine while cutting. The chipboard setting will cut the puzzle it in 24 passes, but in my case it cut it on the 17th pass. Check it before removing the mat.
Finally, glue the outline to the base with hot glue carefully, make sure there is no hot glue on the edges or it will interfere with the puzzle to fit inside. And that’s it! Let me know your comments about below. This tutorial on how to create a photo puzzle with Cricut is awesome, isn’t it?