-
×
 Birthday diva rhinestone
1 × $5.99
Birthday diva rhinestone
1 × $5.99 -
×
 Jamaican woman SVG file
1 × $5.99
Jamaican woman SVG file
1 × $5.99 -
×
 Danger proud basketball mom
1 × $5.99
Danger proud basketball mom
1 × $5.99 -
×
 Anna Princess wine glass SVG
1 × $2.45
Anna Princess wine glass SVG
1 × $2.45 -
×
 Rolling stones vintage distressed
1 × $2.99
Rolling stones vintage distressed
1 × $2.99 -
×
 Auburn Rhinestone High Heel
1 × $5.99
Auburn Rhinestone High Heel
1 × $5.99 -
×
 Christmas wine glass svg
1 × $5.99
Christmas wine glass svg
1 × $5.99 -
×
 Jesus is the reason for the season
1 × $5.99
Jesus is the reason for the season
1 × $5.99 -
×
 Regular Svg file convert
1 × $5.99
Regular Svg file convert
1 × $5.99 -
×
 Alabama Crimson NCAA
1 × $3.91
Alabama Crimson NCAA
1 × $3.91 -
×
 God is the Plug Rhinestone svg
1 × $5.99
God is the Plug Rhinestone svg
1 × $5.99 -
×
 Dabbing unicorn
1 × $1.99
Dabbing unicorn
1 × $1.99 -
×
 Believe hairstylist salon quote
1 × $2.49
Believe hairstylist salon quote
1 × $2.49 -
×
 Baltimore Ravens lips
1 × $3.91
Baltimore Ravens lips
1 × $3.91 -
×
 Princess Disney wine glass
1 × $7.49
Princess Disney wine glass
1 × $7.49 -
×
 Alabama State university ASU Hornets Rhinestone
1 × $5.99
Alabama State university ASU Hornets Rhinestone
1 × $5.99 -
×
 Black woman queen
1 × $2.99
Black woman queen
1 × $2.99 -
×
 Nail Tech Rhinestone Design
1 × $5.99
Nail Tech Rhinestone Design
1 × $5.99 -
×
 Olaf Frozen svg and printable
1 × $2.45
Olaf Frozen svg and printable
1 × $2.45 -
×
 Santa Hat Wine glass svg
1 × $5.99
Santa Hat Wine glass svg
1 × $5.99 -
×
 Minnie mouse wine glass svg
1 × $2.49
Minnie mouse wine glass svg
1 × $2.49 -
×
 Martin Luther King Live The Dream SVG
1 × $2.99
Martin Luther King Live The Dream SVG
1 × $2.99 -
×
 Download It's My Birthday Martini Glass Rhinestone
1 × $7.99
Download It's My Birthday Martini Glass Rhinestone
1 × $7.99 -
×
 I love my HBCU
1 × $5.99
I love my HBCU
1 × $5.99 -
×
 Dripping lips JSU tigers
1 × $3.91
Dripping lips JSU tigers
1 × $3.91 -
×
 Mickey hugging a pocket svg
1 × $1.99
Mickey hugging a pocket svg
1 × $1.99 -
×
 Sitting girl cake topper download
1 × $7.49
Sitting girl cake topper download
1 × $7.49 -
×
 Download Rhinestone font BGARTscript3
1 × $9.99
Download Rhinestone font BGARTscript3
1 × $9.99 -
×
 Christmas Wine glass svg
1 × $3.99
Christmas Wine glass svg
1 × $3.99 -
×
 St Patrick's Day Rhinestone Love Clover svg
1 × $5.99
St Patrick's Day Rhinestone Love Clover svg
1 × $5.99 -
×
 15 Birthday Crown Cake Topper SVG
1 × $2.99
15 Birthday Crown Cake Topper SVG
1 × $2.99 -
×
 Download Grandma Sixties Rhinestone
1 × $12.99
Download Grandma Sixties Rhinestone
1 × $12.99 -
×
 Dripping lips Cleveland Browns
1 × $3.91
Dripping lips Cleveland Browns
1 × $3.91 -
×
 Birthday entourage girls
1 × $5.99
Birthday entourage girls
1 × $5.99 -
×
 Template for use slice in design space app
1 × $3.91
Template for use slice in design space app
1 × $3.91 -
×
 Dripping lips Tuskegee svg
1 × $3.91
Dripping lips Tuskegee svg
1 × $3.91 -
×
 Custom cake topper
1 × $9.99
Custom cake topper
1 × $9.99 -
×
 Small Rhinestone font
1 × $9.99
Small Rhinestone font
1 × $9.99 -
×
 LSU tigers Rhinestone SVG
1 × $5.99
LSU tigers Rhinestone SVG
1 × $5.99 -
×
 Dripping lips florida gators
1 × $3.91
Dripping lips florida gators
1 × $3.91
Cutting and Crafting
Wooden wall lights with Cricut
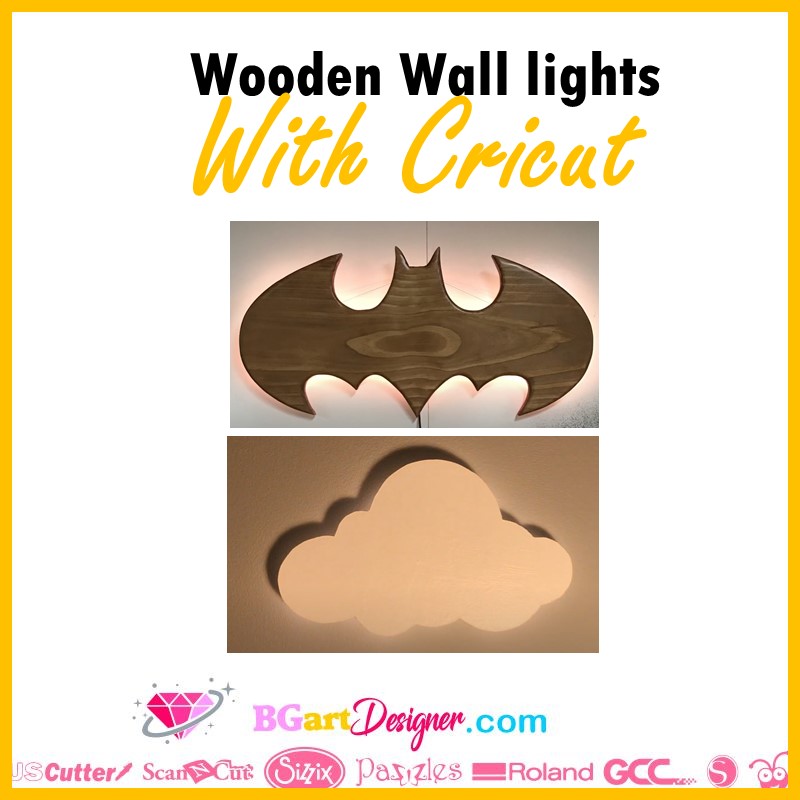
Creating wooden wall lights is possible using a Cricut machine!
To make a wooden wall light it is necessary to purchase or have the cricut maker machine. This amazing machine is capable of cutting wood, so in this project we are going to take advantage of it. There are a lot of projects that can be done with this feature, such as a family birthday calendar, sublimated wood or burned wood to customize a piece!
Supplies needed
- 2mm basswood
- battery operated buck lights
- painters tape
- Cricut knife blade
- Acrylic paints
- Strong grip mat
- Cotton twine
First, create the design in cricut design space and click make it. Cutting wood is totally different from cutting vinyl. When cutting wood, the machine will make multiple passes to cut through the material. It will take longer but it is part of the process.
The most important thing to do when cutting wood is to insert the blade into the cricut maker. Then calibrate the blade by following the instructions found on the cricut website. Above all, move the white star wheels all the way to the end of the machine, so they don’t get in the way when using thicker material such as wood. Use a strong grip mat and tape the material to keep it in place.
Here’s a tip for this particular project. To make the wall light look more 3D, create two layers of the design. This will also help make the wall light more sturdy. Since the wood looks the same on both sides we don’t need to mirror the design, but if that is not the case for you, then mirror the design in order to glue both layers together properly.
If desired, paint the front and back of the wall form after gluing the lights. Take acrylic paint and a paintbrush.
Assembling the wooden wall light
To assemble wooden wall lights created with a cricut machine; first paint and glue the two layers of the form. Once you’ve glued the two layers of the wood form together, it’s time to add the lights. Get some battery operated push lights, they are great because they can be turned on and off with pressure. For kids is easy to use and doesn’t require an engineering process.
If the form is too large, you can add more than one light.
In case the button doesn’t reach the wall to be pushed, cut some wooden circles and glue them on. Finally glue them on the light button. Once the glue has dried, attach the light, gluing it to the back of the wooden form. The idea here is that the button faces the wall. So when we push the wooden shape, the button is pressed. Finally, add some twine to create a hanger that will go on the wall.