Cricut Design Space, Cutting and Crafting
Custom suncatcher stickers with cricut
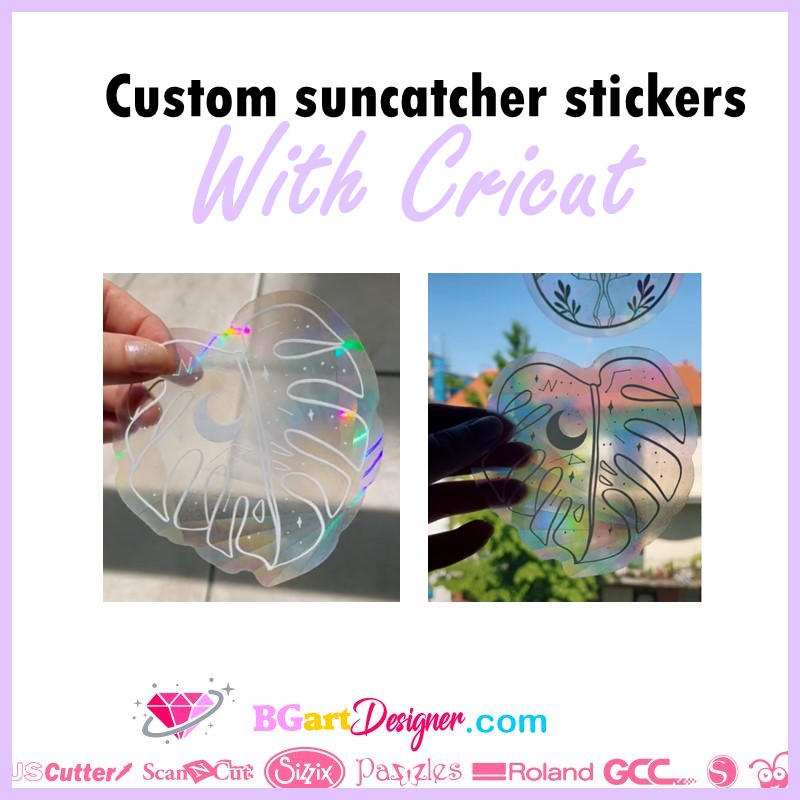
Custom suncatcher stickers with cricut machines! A super trendy project that is simple to create.
Learn how to create personalized and trendy sun catcher stickers. People love them. It’s a cute and versatile project that can serve as decoration at home, in the car, in the office… pretty much anywhere. Above all, it’s important to have a window or sunny space to make it looks amazing.
Supplies needed
- Holographic vinyl
- Strong grip mat
- Squeegee
- Suncatcher cling
- Cricut cutting machine
- Tac transfer tape
- Parchment paper
Design creation
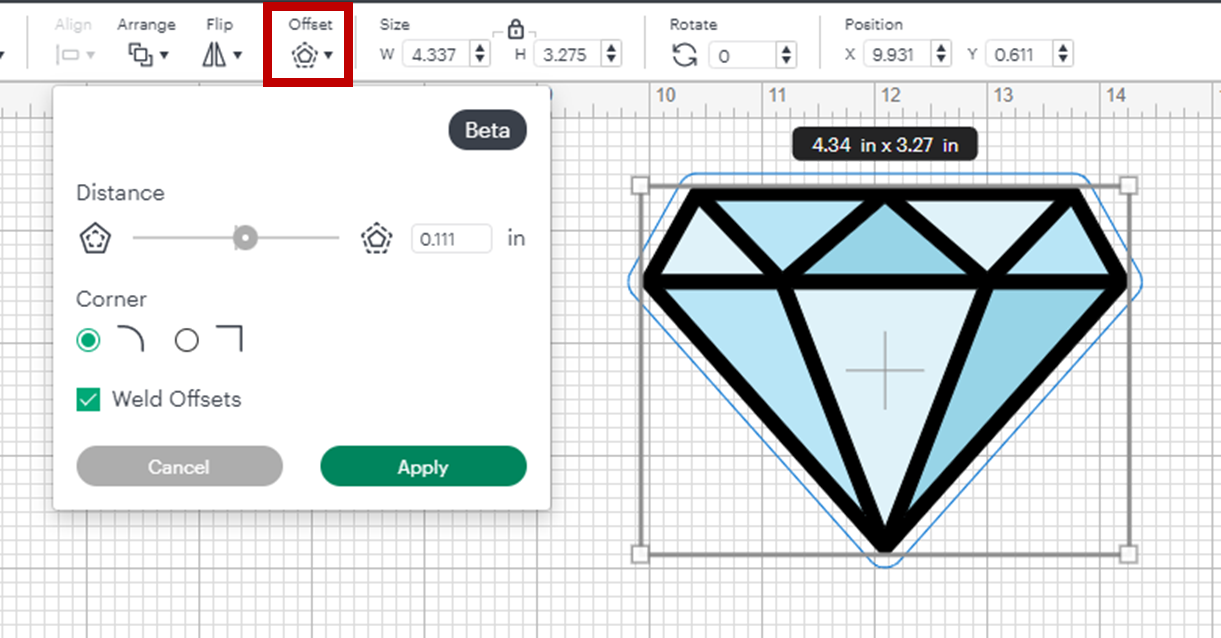
To clarify, it is possible to do this custom suncatcher stickers with Cricut design space or any other software. First, find a design HERE, or use a cricut image. Duplicate the design, because we need two layers for this project to work. One layer will be the background, and we are going to cut it out of the window cling sheet. The other layer will be on top, and we are going to cut it out of holographic vinyl.
Keep one layer as it is. And create a small offset on the other layer to add. That will be a sort of border to the design. And at the same time will be the backing layer we need. Select the solid layer design and select the “offset” tool. Create a slight offset, otherwise the design will be distorted a little.
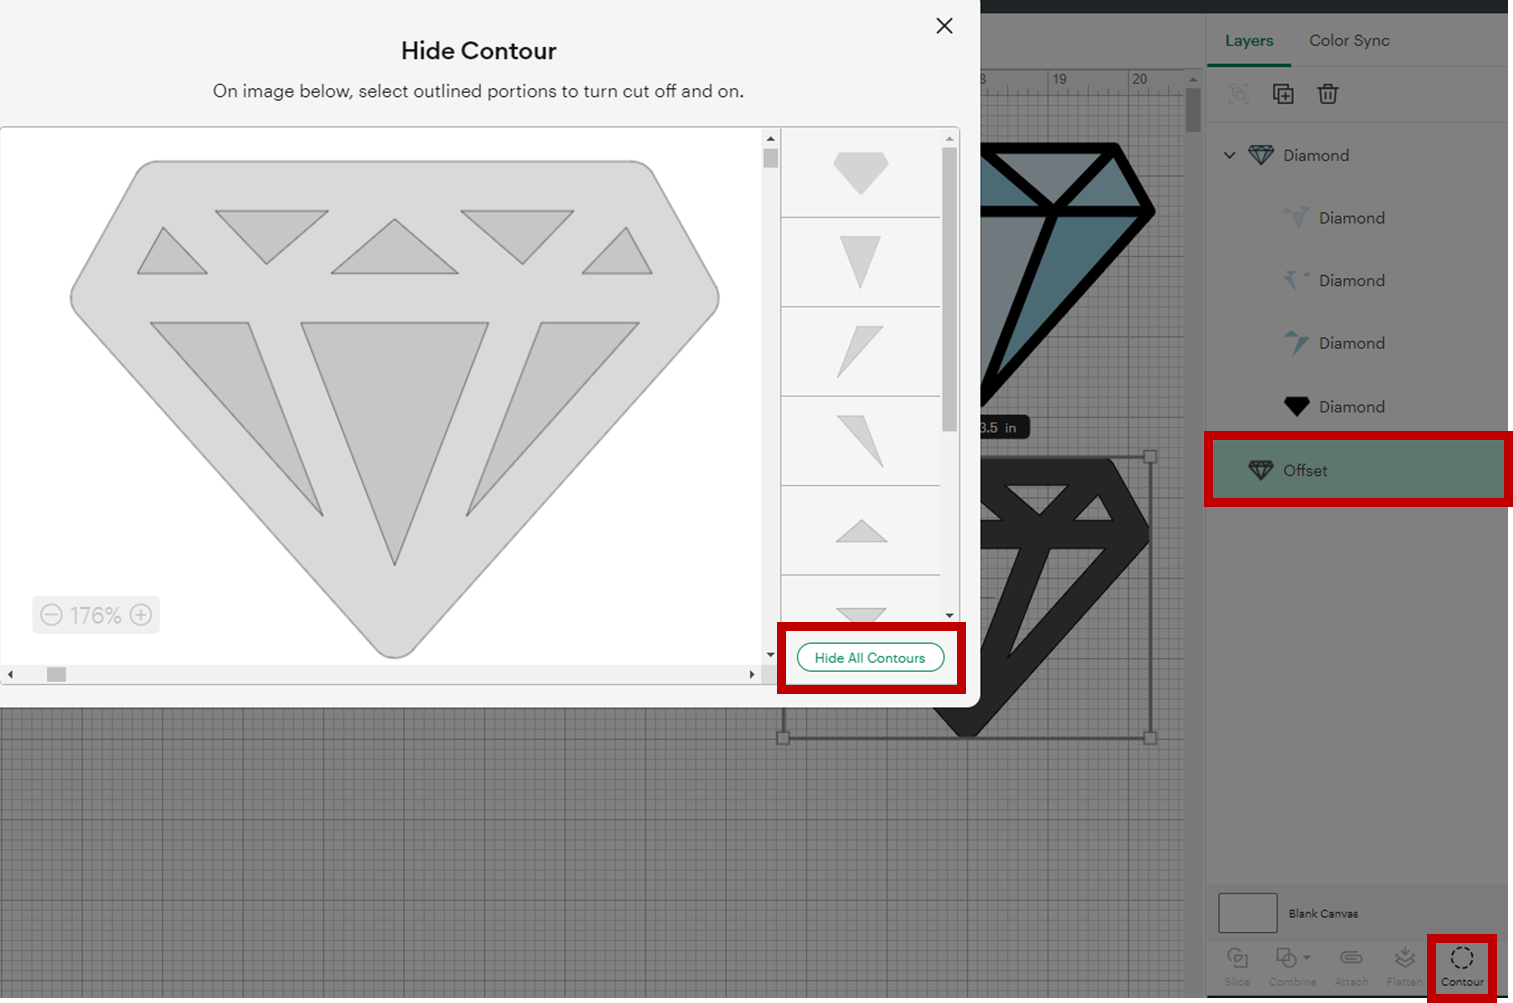
To have only the background of the image, edit the offset layer going to the Contour tool in the bottom right bar. Click on “hide all contours”. This will make the design a solid shape. Send it to the back and change its color to make it easier to see. This will allow the design to be added a little more easily to the suncatcher film.
Cutting the layers
To create custom suncatcher stickers with cricut first, cut the vinyl. The design itself will be made of vinyl. It is best to cut it first because the second cut will be the suncatcher sheet, and as long as it is attached to the cricut mat it is easier to put it all together. As a recommendation, use holographic vinyl.
For this project, we do not need to mirror the design. But to have a better result when cutting the holographic vinyl click on “add more pressure” when cutting. Place the vinyl on the mat with the colored side facing up and apply pressure. Do not use a squeegee with this material because it can scratch it, just use your hands.
After that, it’s time to cut the window cling. It comes in a large roll and has no measurement. Here’s a trick to cut it perfectly. Roll out one edge of the window cling and place it on the mat. Cut out the size of the design you have created so you don’t waste material. Cut out the material using the mat as a guide. Then use a squeegee on this type of material to make sure it adheres well to the strong grip mat.
It is a kind of heavier plastic material. That’s why it’s important to set the correct cut setting. The medium card stock setting works best with window cling, but as a recommendation do some test cuts on your machine, to see which setting works best. Remember that in the window cling we are going to cut the layer of the solid shape.
Assembling the suncatcher stickers with cricut
First of all, weed the vinyl and carefully weed the edge of the window cling design. This material has a protective backing. To clarify, Cricut machines don’t usually cut it, but that’s okay. Take the window cling and peel it off the mat. Remove the backing paper and stick it back on the mat.
That is a recommendation, because while it is on the mat it is easier to manipulate. Off the mat the material will curl back to its original shape. Secondly, get some transfer tape. Tac style is best, place the decal face down to the transfer tape and squeegee it down so it adheres well.
Above all, in the window cling it is really difficlut to recognize the design. So as a recommendation use the parchment paper method when assembling the layers. that way you can align everything very simple and nothing will stick where it doesn’t have to.
Parchment paper method
This method consists of putting some parchment paper on top of the adhewindow cling design (in this case) and leaving just a little bit of design space on top, to place the vinyl. The entire vinyl design will temporarily adhere to the parchment paper, and if we make a mistake it is easy to work around.
Place the design on the adhesive vinyl keeping in mind the size of the offset to align the vinyl accordingly. finally, remove the parchment paper slowly. Start applying pressure on the design while removing the parchment paper. Do it little by little until you remove all the parchment paper. This helps to avoid bubbles.
Use a squeegee to adhere well the vinyl over the window cling and remove the entire piece from the mat by turning it upside down. Most importantly, keep in mind that the vinyl will have a bit of texture, but that’s for the window, and they still look great. Finally, carefully and slowly remove the transfer tape from the vinyl and window cling.
How and where to adhere it
To stick it on the window just make sure that the window is really clean. leave the window slightly damp, and take the window cleaner and leave a little bit on the surface of the window. that will make the suncatcher sticker adheres perfectly to the window, it also sticks on acrylic.