Cutting and Crafting
Double sided gift tags with Cricut

Create double-sided gift tags with a Cricut machine , just trick the process and get it right!
For this project we will have to trick our machine, it sounds weird but it works perfectly! In order to create a label with designs on both sides of the it, there are some tricks you need to apply, discover them in this post! In BGArtDesigner there are other ways to create and customize lables, tags for benies, tags for pets and so more!
Supplies needed
- Cardstock
- Light grip mat
- Printer
- Cricut pens
Customize the tag front
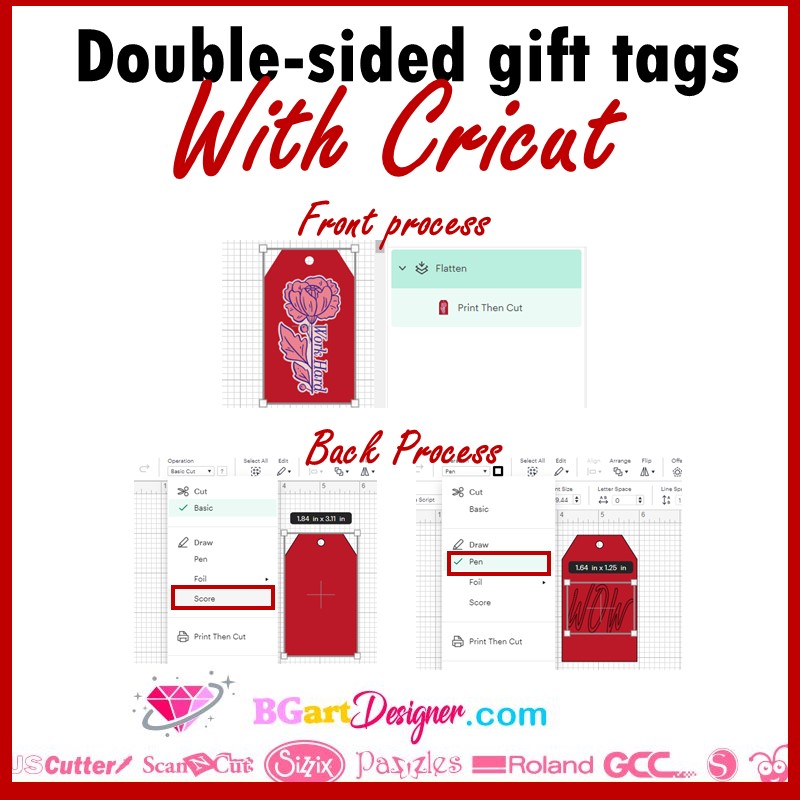
First, open cricut design space and go to images. Select “free” and several different designs will appear. Modify the design if necessary. It is possible to remove layers, change colors and customize the design. Customize the front label with a print then cut image. First, size the label, then upload the image, and finally size it according to the label. Select both, go up to the toolbar and click on “align”, then “center”.

This step is important, you could attach the layers so they don’t move, but the cricut machine will cut every line of the design. The idea here is to just print the image and cut the label. To do this select all the elements and click on “flatten” in the lower right corner.
Then add as many copies as you want. To do this it is possible to copy and paste into the canvas or click on make it and then change the copies of the project in the upper left corner.
Use some cardstock for this project, send it to print. After that to cut the label, select the medium cardstock material option , it works well for 65 pounds cardstock. As a recomendation use the light grip mat, it is better to remove the paper and prevent it from wrapping.
Customize the tag back
Now comes the real trick! Let’s write on the back of this label. First modify the design. Select the label and duplicate it. Next, unflatten the label and delete the image we printed earlier. Now add a text and select a nice font.
Here is an aditional tip. If you add the word and then press enter to add another word in the same box, the align option will not appear. to do this, find the advanced option in the top toolbar and click on ungroup lines. Now you can align the text. Then group the text to resize it to fit inside the label.
So the text here is set to draw (make sure you set it) but the label is set to print then cut. so if we change the label to cut it’s going to cut the label again and we already cut it, tha’s not going to work and here’s a super hack to solve it.
First of all, select just the label, and change it to “score” by going to the operations panel on the top toolbar. Normally what scoring does is create a crease to fold the cards easily and you have to put your scoring wheel on the machine.


So the trick here is not to put any scoring wheel on the machine. the cricut will do the scoring procedure, but without actually marking the label because there is no tool for that. In this case, attach all the elements, and click do it.
Aligning the tags on the mat
Finally, to create double sided tags with cricut by customizing the back of the labels we have to remove them from the mat. So lining them up again will be a bit tricky, but as always here are some tips to achieve perfection! Leave one inch margin on all edges on the canva mat and take it as a reference to align the labels on the light grip mat.
Make sure that the space between the labels is one inch as well, which will make the alignment procedure easy. If not all of the labels fit on the Canva mat, click one of the designs. Then click on the three dots, and click “move object”. After that select “new” to add another mat and move the remaining designs to there.
Our idea is that the machine will not cut anything, but it will do all the procedures no matter what. The most important thing here is NOT to add the score tool to the machine. Just select on the tools the “scoring stylus” after sending it to “scoring” and press apply. The machine will first ” score” the tags and then we will be able to draw on them, just by placing the cricut pen!
