-
×
 Living My Best life
1 × $2.99
Living My Best life
1 × $2.99
Cutting and Crafting
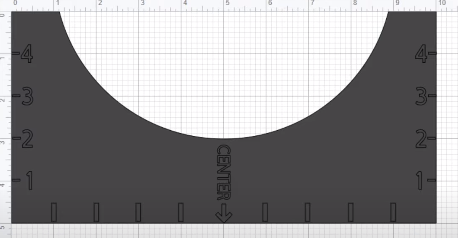
T-shirt ruler guide with Cricut
Learn to create a T-shirt ruler using a Cricut with this guide! It will facilitate the entire process of adding a design to a t-shirt for sure!
If you have a t-shirt customization business, adding vinyl designs, sublimation or rhinestone designs and have trouble lining them up every time, this post is the solution! Stop struggling with t-shirt alignment, and learn how to make a t-shirt ruler, and how to use it!
The placement of the design on a t-shirt makes a difference, putting it too low or too high will not look good on the t-shirt. Sometimes it’s hard to know exactly where to place the design. A t-shirt ruler will make the process easier, so learn how to create your own t-shirt ruler with a Cricut following this guide!
Supplies needed
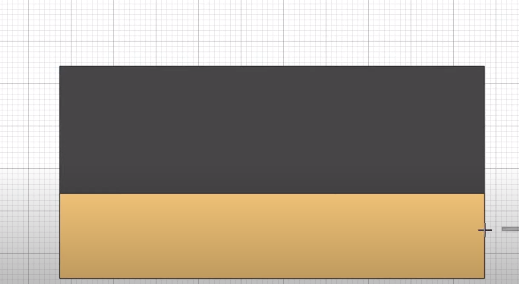
First of all, go to cricut design and space and insert a rectangle, resize it to be 10 inches wide by 5 inches high. duplicate the template, but resize it to be 2 inches high, change its color to diferentiate it. select both and align the small template at the bottom and then center it horizontally.
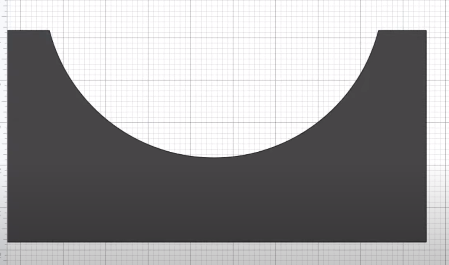
reselect both pieces then click on “cut” and remove the extra layer in the background. insert an 8 inch circle and align it with the bottom of the top rectangle, select both and click “align to bottom” and then “center horizontally”.
Now, select just both rectangles and click “weld”. After that, select the piece and the circle and click “slice”. Delete all parts that are not necessary. Here you have the template for the T-shirt ruler, now let’s add the markings!
Marking the T-shirt ruler
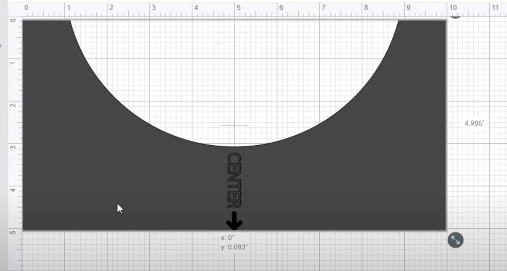
First of all, add an arrow to help as a guide in the center of the ruler. rotate it 90 degrees, make it as big as you want and place it at the bottom. select the arrow and the piece and click on “align to bottom” and then on “center horizontally”.
It’s time to add the numbers and measurements. To do this align the piece on the grid marks all the way up to use the grid as the proper markings on the T-shirt ruler. Insert a line as large as you want and align it according to the grid. It is possible to mark only the bigger dimensions, or also create smaller lines to make the ruler more accurate.
With three lines you can start copying and pasting to speed up the process, of course make sure they are well aligned. Select all lines and copy them to the other side. Then add the number to the sides of the lines. Copy and paste them on the opposite side. On each side select all the lines and numbers and click “center horizontally” then click “attach”.
At the bottom also insert some lines following the grid marks. In this case, rotate the lines 90 degrees. Copy and paste two or three lines at a time, to speed up the process. then select all the marks and align them vertically. Attach all the bottom lines. Select both the lines and the ruler template to click on “align to bottom”.
Name the ruler so as not to confuse them in the future, this is the adult t-shirt ruler.
Cutting the T-shirt ruler
There are two different methods for cutting this T-shirt ruler with a Cricut machine, and both are described in this guide. The first is to cut it with card stock and the second is using plastic chopping mat.
Cardstock T-shirt ruler
To make a T-shirt ruler with cardstock it is necessary to have the pen tool. For this we have two layers. One with the template of the ruler which will be a cut design and the other which are the marks that will use the “draw” option. Attach all the marks and numbers. Select it and change its setting to “draw”. It is important to leave the ruler template as a cutting file.
Once cut out, place the mat face down and remove the cardstock from the mat to prevent the material from tearing or curling.
Make sure the cardstock is sturdy enough for constant use.
Chopping mat T-shirt ruler
The other way is to use a plastic chopping mat. You can either cut the whole piece or engrave the markings and just cut the ruler template. For this second option select the marks and numbers, attach them and change their settings to the ” engrave ” option. Leave the ruler template as the cut file.
Attach everything together, the marks and the ruler template. Here we can use the fine point blade to cut and engrave the plastic. click on “mirror” so that the engraved texture is at the underside of the ruler and is legible. Search for “acetate” in the material settings. Leave the default pressure and speed. Finally, place the smooth side down on the purple strong-grip mat and send it to cut.
Once this is done do not remove the mat from the machine make sure it is well cut if not, send it to cut again without moving anything.
How to use the t-shirt ruler
this ruler works by aligning the top edge of the ruler below the seam of the shirt. Don’t worry if the curve of the ruler doesn’t exactly match the seam of the shirt, it doesn’t matter. Next, line up the design. First find the center of the design, fold the trasnfer tape in the center matching the sides of the vinyl. Be careful not to curl the vinyl, just make a small guide line on the transfer tape.
Finally, match the line of the transfer tape to the center line of the T-shirt ruler. And that’s all!