Cutting and Crafting
How to make removable tumbler topper
Make a removable topper for a tumbler. Customize the tumbler with glitter and some extra elements!
To customize a tumbler it is possible to create a removable topper for it. It is very easy and fun. A removable topper would be like the icing on the cake when it comes to personalize a topper! check it out.
First of all, let’s spray paint and add some glitter to the topper. For that, prepare the tumbler by sanding it with a sanding block. Tape the upper rim where the topper will be screwed on with electrical tape. To prevent the epoxy from getting in there because the idea is to screw the topper on.
After that, spray paint the tumbler. If you don’t have the same color as the glitter, spray it with white. It is also possible and it will look great combining colors and making a fade from the bottom to the top. Once the paint dries, apply the glitter with the epoxy method.
Epoxy method
Supplies needed
- Vinyl
- Spray paint
- Electrical tape
- Artist Resin
- UV resin
- Sanding block
- Glitter
- Epoxy
- Gloves
The epoxy method consists of applying a thin coat of the epoxy mixture to the entire surface of the tumbler, incluiding the bottom of it. For that, use your gloved finger. Make sure it is a thin coat, otherwise the epoxy will absorb the glitter, consequently more glitter will be necessary to cover the surface.
Finally, use the heat gun to set the epoxy for a couple of seconds. This is to remove the streaks on the tumbler. Place the heat gun 10 inches away from the glass and remove all the streaks. After that, start covering with glitter the entire tumbler. As a recommendation use different types and tones of glitter to obtain a dynamic and dimensional fade.
Put a piece of paper under the tumbler to be able to return the excess that falls on the paper to the bottle. Above all, do not wait for the epoxy to set completely before removing the electrical tape, otherwise it will be difficult to do so. while the glitter sets, cut out some decals to add to the tumblers using a Cricut cutting machine. At BGArtdesigner.com there are tons of awesome designs, check them out!
The last step to have the glasses done is to seal the decals. To do this, apply a first coat of UV resin to the entire tumbler and let it dry for 45 minutes. Next, apply a coat of epoxy by placing a little more electrical tape on the rim of the tumbler. Finally, add a coat of artistic resin and the tumblers will be ready.
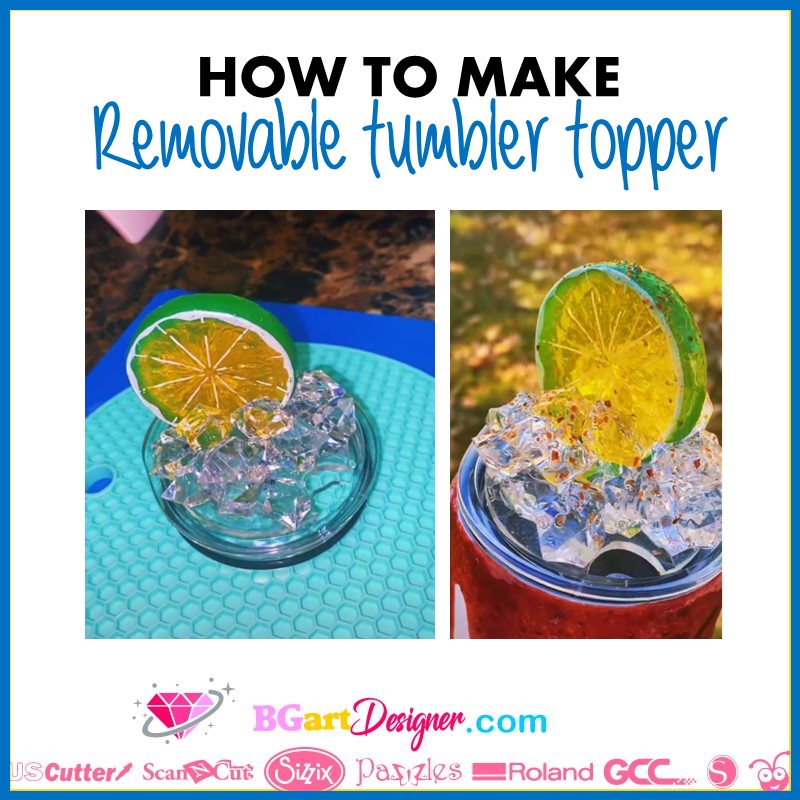
Making the removable topper
Let’s make the removable lids. Get some car coaster molds, the larger size molds fit nicely in the crevice of the lids and fit the glasses. Mix up about 30ml of epoxy and put some glitter in. Make sure to add enough glitter. Fill the molds with the mixture. After that, set them aside to let them cure a full 24 hours.
An alternative for car coasters is to use a piece of acrylic, although you will probably have to cut a hole in it to fit the topper When the coaster mixing time is up, take all the elements to build the topper:
Firstly, unmold the coasters and take some hot glue to adhere the elements, that glue makes the process faster. Keep in mind, if the topper has a hole in the center for a straw, it is necessary to drill the hole in the coaster. In addition, be sure not to place the ices in a way that blocks the entrance of the straw. At the end seal the free spots using some regular epoxy to make sure water won’t get in there.
Finally, add some magnets on the top of the topper and others in the same place but on the bottom of the coaster. Add some UV resin around the magnets so that they really stick to the surface. With the magnets it will be possible to lift the topper easily. The topper will be removable but will not fall off if you turn the tumbler over.