Cutting and Crafting
Tutorial purse handbag using a Cricut machine
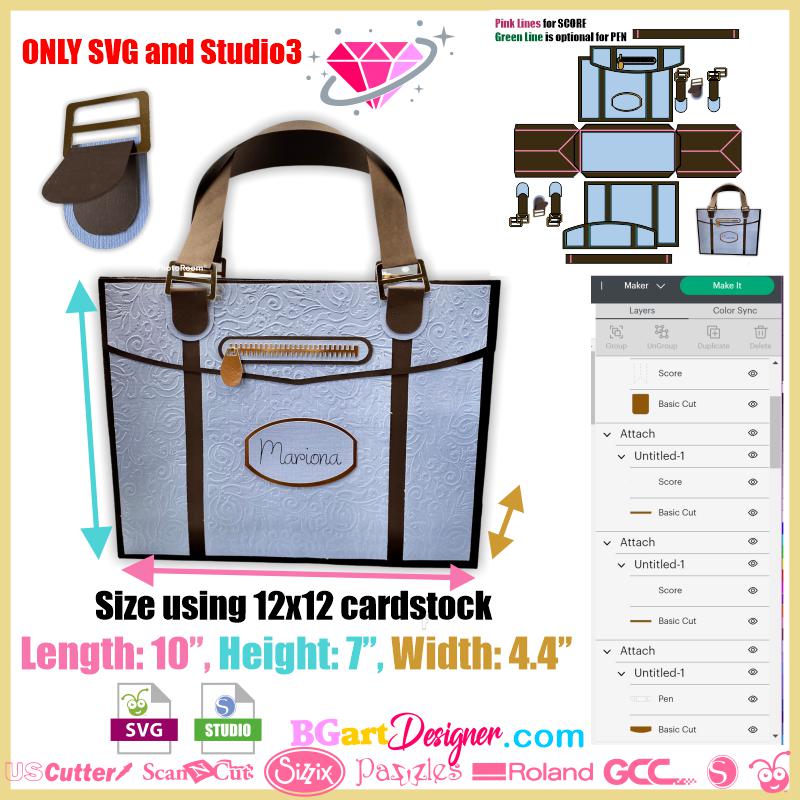
Make a cardboard purse handbag by following this tutorial, grab a cricut machine and get to work! This tutorial is great for making a different kind of bag to put a gift inside, it’s super cool and modern.
Supplies needed
- Download the template HERE
- Double-sided color cardstock
- Glitter cardstock
- Adhesive vinyl
- Craft bond glue/ Regular clear tacky glue
- Double-sided tape
- Cricut cutting machine
Cricut cutting tips
First, cut with a Cricut cutting machine all the pieces to create the bag. Cut the big pieces in cardstock; and make a double layer of the small pieces to make them more durable.
In addition, as a recommendation, cut the second layer of the zipper and buckles in metallic vinyl to make the bag look more real and stunning. Also cut the letters or logos in smart adhesive vinyl to be able to place them easily and avoid failed cuts with the cardstock.
Use the strong grip mat (the purple Cricut mat) to cut the glitter cardstock and add more pressure to the settings. Also cut the glitter cardstock pieces at the end because the blade will end up completely covered with glitter and we will have to clean it. Or instead of using glitter cardstock you can use printing paper, or even a design printed on sticker paper, get some awesome designs on my website bgartdesigner.
To clean the blade, take a cotton swab and run it over the blade, push the blade up and with the swab wipe it very carefully and wipe it all around.
Assembling the purse handbag
Once you have cut everything out, go ahead and fold the lines. Assemble all the pieces adding glue. Take the strips from the cube and curl them down the middle using a tool that has a rounded edge, such as the end of the Cricut weeding tool, so that they look more natural and don’t look like they were bent tightly.
When assembling the bottom part make sure that the flexible part of the side pieces are on the bottom and not on the top. Aligned them on the bottom as well. Finally, glue the front part to the tabs on the sides. If you want, you can make a pocket on the inside of the front part. Just cut a rectangle and make folds on each edge to glue it to the cardstock inside.
First, glue the bottom, and finally, glue the front part to the side pieces. Press on the inside to make sure it is well glued. Repeat the process with the back part. To make the handles, simply fold each end a little and glue them to the buckets. Fold the straps a little to relieve the tension on the buckets. Certainly you can add little details such as a label, by putting a ribbon and attaching it to the straps.
This tutorial on how to make a purse handbag using a Cricut ends up being super fun, let me know your comments below!