Cutting and Crafting
Word search Mother’s day gift idea with Cricut

Here’s a tutorial for a gift idea for your mother using a Cricut! Certainly, it’s very easy to make, and can be personalized with any name, perfect for this Mother’s Day!
Supplies needed
- Glass picture frame
- Permanent vinyl
- Transfer tape
- Painters tape
- Hot glue
- Cutting machine
- Cutting mat
Creating the word search
The first step to follow this idea and make a gift for your mother using a Cricut is to go to a computer. Click on this word search maker to create a custom word search. A box called “words” will appear, there type in the names of family members or words that will appear in the word search. Then scroll down and select the number of letters the word search will contain. A 10-by-10 word search will be fine.
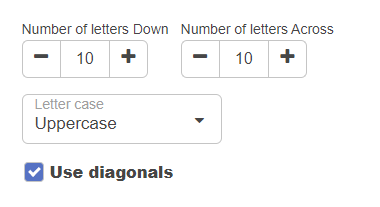
As a recommendation, select the “uppercase” option for better visualization. Also, click on the “use diagonals” option. This is so that the words also appear diagonally. Finally, click on create, and the word search will appear on the right side of the screen.
Now click on “answer key” to see where the words are. If you don’t like the position, click “scramble” to change it, then click “answer key” again to see how it looks. Repeat this until the words are positioned correctly for you.
Next, click on “worksheet” and expand the screen. Make the alphabet soup as large as possible, making sure it fits completely on the screen. Next, take a screenshot by pressing “PRT SCR” on the keyboard, select the entire design, save the image and upload it to Cricut Design Space.
Cricut design space process
In Cricut design space a screen will appear with three options, select the “complex” one. Click continue, and then remove the background. To do this click on advanced options and reduce the colors to two. This will convert the white to gray. After that, increase the color tolerance to 100 and then start clicking on the gray areas to remove them.
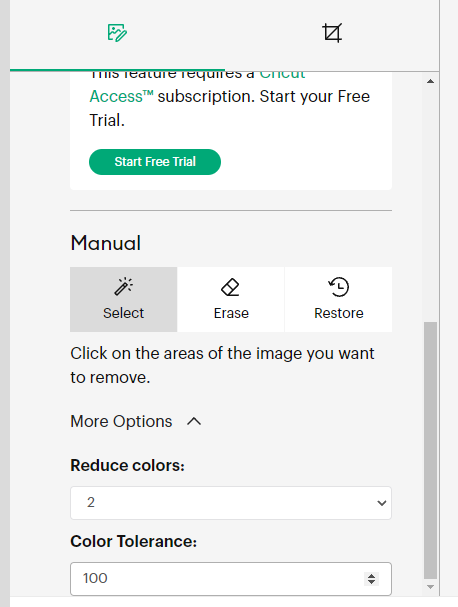
Click on the preview, to see if any points are missing. If so, look where they are and click “hide preview” again, then select the points and delete them. Then click continue and select the ” cut image” option. Finally, upload and insert the image.
Create a template to size the design. Insert a square and size it to the measurements of the glass frame. Place the design elements on the template to size them. Align them horizontally as well. In addition to the word search, add the mother word in calligraphy at the top, a phrase or silhouette to decorate the glass. By the way you can find awesome design at bgartdesigner.
Also, add strokes or ovals to mark the names in the word search. If some of the pieces overlap there are two options. Cut each one individually, and then overlap them, or weld the overlapping pieces together. To do this, select all the pieces. Right-click and click “weld”. This will turn the three pieces into one piece.
Finally, delete template to cut the elements. Next, mirror the design, this is because we are going to add it on the glass back for more durability. Select the material and place the piece of vinyl on a cutting mat. Make sure there are no wrinkles or bubbles to start cutting the vinyl. Next, remove the vinyl from the cutting mat, turning it face down.
Method to transfer the decal
Weed the design and place a piece of transfer tape on the work surface with the adhesive side facing up. Next, place the vinyl over the transfer and smooth it with the scraper tool.
This method is recommended for applying the vinyl to the frame. Remove the glass from the frame and clean it. Then place the design on the frame, the backing sheet should be touching the glass and the transfer tape should be face up. Center the decal using a ruler.
Next, add a piece of painter’s tape to the center of the design and press the tape onto the glass. The painter’s tape will allow us to work with one side first and then the other, to avoid wrinkles and misplacement of the decal. So start separating one side of the vinyl from the transfer carrier sheet.
Cut the carrier sheet, while holding the transfer up without touching the glass. Next, use a scraping tool to press that side of the design from the center outward. Finally, remove the painter’s tape and the rest of the backing sheet and scrape the design from the center to the outward as well. Carefully remove the transfer tape at the end.
Next, place the created brush strokes or ovals over the words. Press firmly around each letter with your fingers to avoid air gaps. To finish the project, add a piece of colored paper behind the glass and then place the frame backing in place. Or make a floating frame by removing the metal tabs and adding hot glue to adhere the glass to the frame, without a backing.
This is a unique gift idea to give your mother on a special day, all you need is a cricut, easy isn’t it? Let me know your comments below.