Cutting and Crafting
Personalize envelopes with Silhouette pen holders
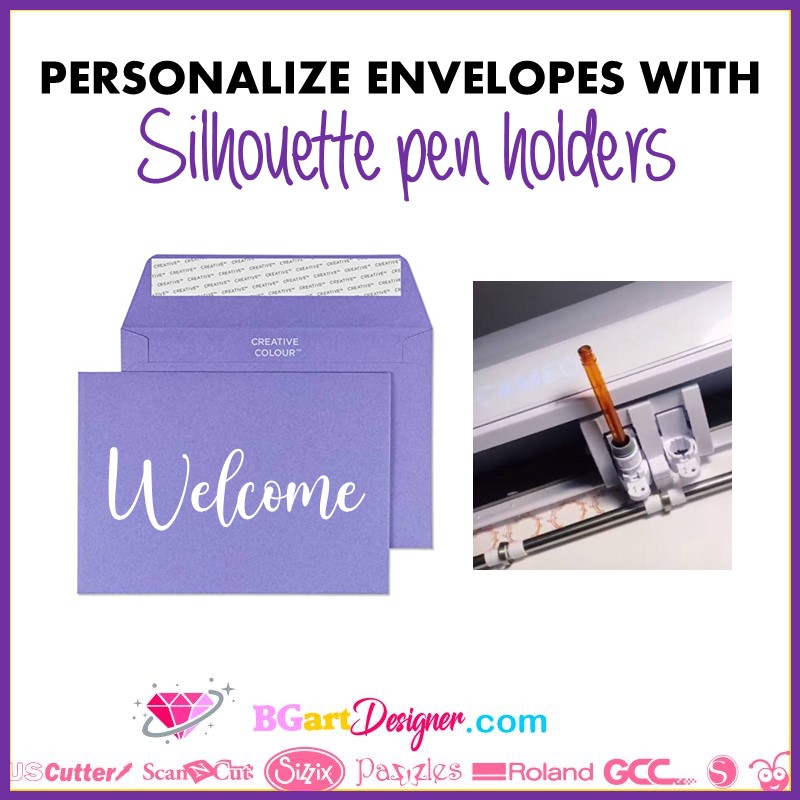
Personalize envelopes using the Silhouette pen holder, for invitation cards or for a gift. Instead of using the blades to make a project, it is possible to create other types of work using pens or markers. The machine will draw rather than cut.
The most important thing to keep in mind is that the machine is drawing, not printing. So it’s important to choose a proper design that works with the technique in BGArtDesigner.com there are many sketch designs perfect for these projects!
Supplies needed
The process in this case is to replace the blade with a sketch pen, which is a Silhouette brand pen almost the size of the blade, to put it in the machine; or use a pen holder to use any pen of your choice. This post will explain how to use the pen holder of the silhouette Cameo 4 to make drawing projects.
Above all, is important to know that rigid tip pens are best for this method, brush pens are not recommended, and thick tip pens are also not very good for use in the silhouette cameo.
It is important to note that for the Silhouette Cameo 4 there is an exclusive pen holder that does not work with other machines. But of course there is a slightly older model that works perfectly with the other Silhouette machines.
The older pen holder does work on the Silhouette Cameo 4, but you need to use the blue adapter with it, which comes with the machine when purchasing it. The pen holder of Silhouette Cameo 4, has three parts:
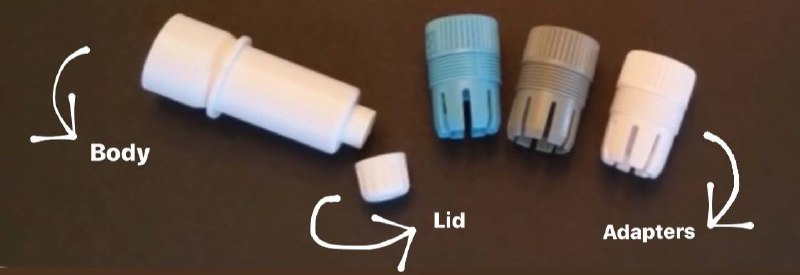
The body is the larger piece and has a hole to insert the adapter with the pen. There are three adapters with different sizes, so to use different thicknesses of pens. Finally there is a little lid, be careful not to lose it is important when inserting the pen. It ensures that the tip of the pen protrudes as far as it needs to.
Inserting the pen
To use the silhouette pen holder and personalize envelopes, you must first choose the adapter that fits the chosen pen. Do not force it, if it does not fit easily, change the adapter. If the next adapter is a little loose, do not worry, it is better this way because when screwing it on, it will be tight.
After that, with the pen inside the adapter it is time to insert both elements into the body of the pen holder, make sure the little lid is on. then push the pen inside. be gentle so as not to ruin the tip. Holding the pen firmly in the position where the tip touches the lid, start screwing the adapter into the body of the pen holder.
Finally, remove the lid and it is ready to be placed in the machine. Insert the pen with the pen holder as if you were inserting a blade. Make sure the silver part of the adapter is towards the back. Slide from the top, to the bottom and press the lever.
Envelope placement tips
Place the envelope on the mat, making sure that the paper is as flat as possible, without many folds. Don’t align it in the upper left corner as you usually do with normal materials. The top of the envelope is the thickest part and it would probably lift up and touch the pen, resulting in marks in that corner.
So, place the envelope more centered on the mat, align it further to the right and down. Another recommendation is to pull the inside rolls toward the edges of the envelope. The area where the envelope is placed is where we are going to design in the silhouette studio. Measure the envelope for that, just the part where the design is going to be.
Designing in Silhouette Studio
Now go to silhouette studio, insert a rectangle with the size of the envelop area, to use it as a template. Place it where you put the envelope on the mat before. It will not be perfectly aligned because when the mat is loaded into the machine it moves one or two millimeters to one side. So, don’t place the design too close to the side of the template.
Insert the design of choice, a text or a figure. In case it is a text, there are some important tips to know. First, when working with calligraphic fonts, it is necessary to weld the lines to remove overlapping center lines. To do this, select the text, right-click and select “weld”.
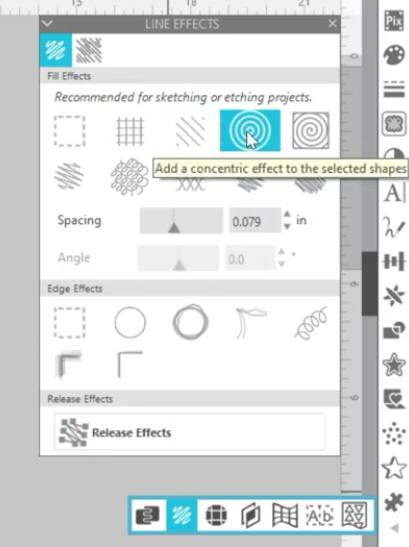
Secondly, The machine can draw the outline of a text or the inside of it, but using different settings. To draw the inside of a letter you have to add cut lines inside the letters, so that the pen can draw them, adding color to the inside will not work.
For that, go to “line effects” it is a sketch icon. There are different styles to fill the letters, but the “concentric effect” (the spiral icon), will make the pen draw completely inside the letters. Modify the “spacing” until the inside of the letters are covered by the lines. The spacing will also depend on the thickness of the pen tip.
Silhouette studio drawing settings
One of the advantages of the Silhouette cameo 4 is the auto-detection of the tools, it automatically changes the configuration if you have changed the tool in the machine.
If you have another machine, be sure to select the design first and then choose the “pen” and “sketch” options. Then lower the pressure to maximum. If it’s a pen that has too much ink, set the speed to fast so it doesn’t leave marks. But if it’s a gel pen, which doesn’t draw easily, lower the speed.
Don’t forget to delete the template before sending the machine to draw, otherwise it will draw it too. Once you send it to draw, and look at the final result if you think it needs a rework, don’t unload the mat, just send the machine to draw again. Finally you will have amazing personalized envelopes using the Silhouette pen holder tool!